Manoid: A Waste Management Robot
2024-06-12Reports
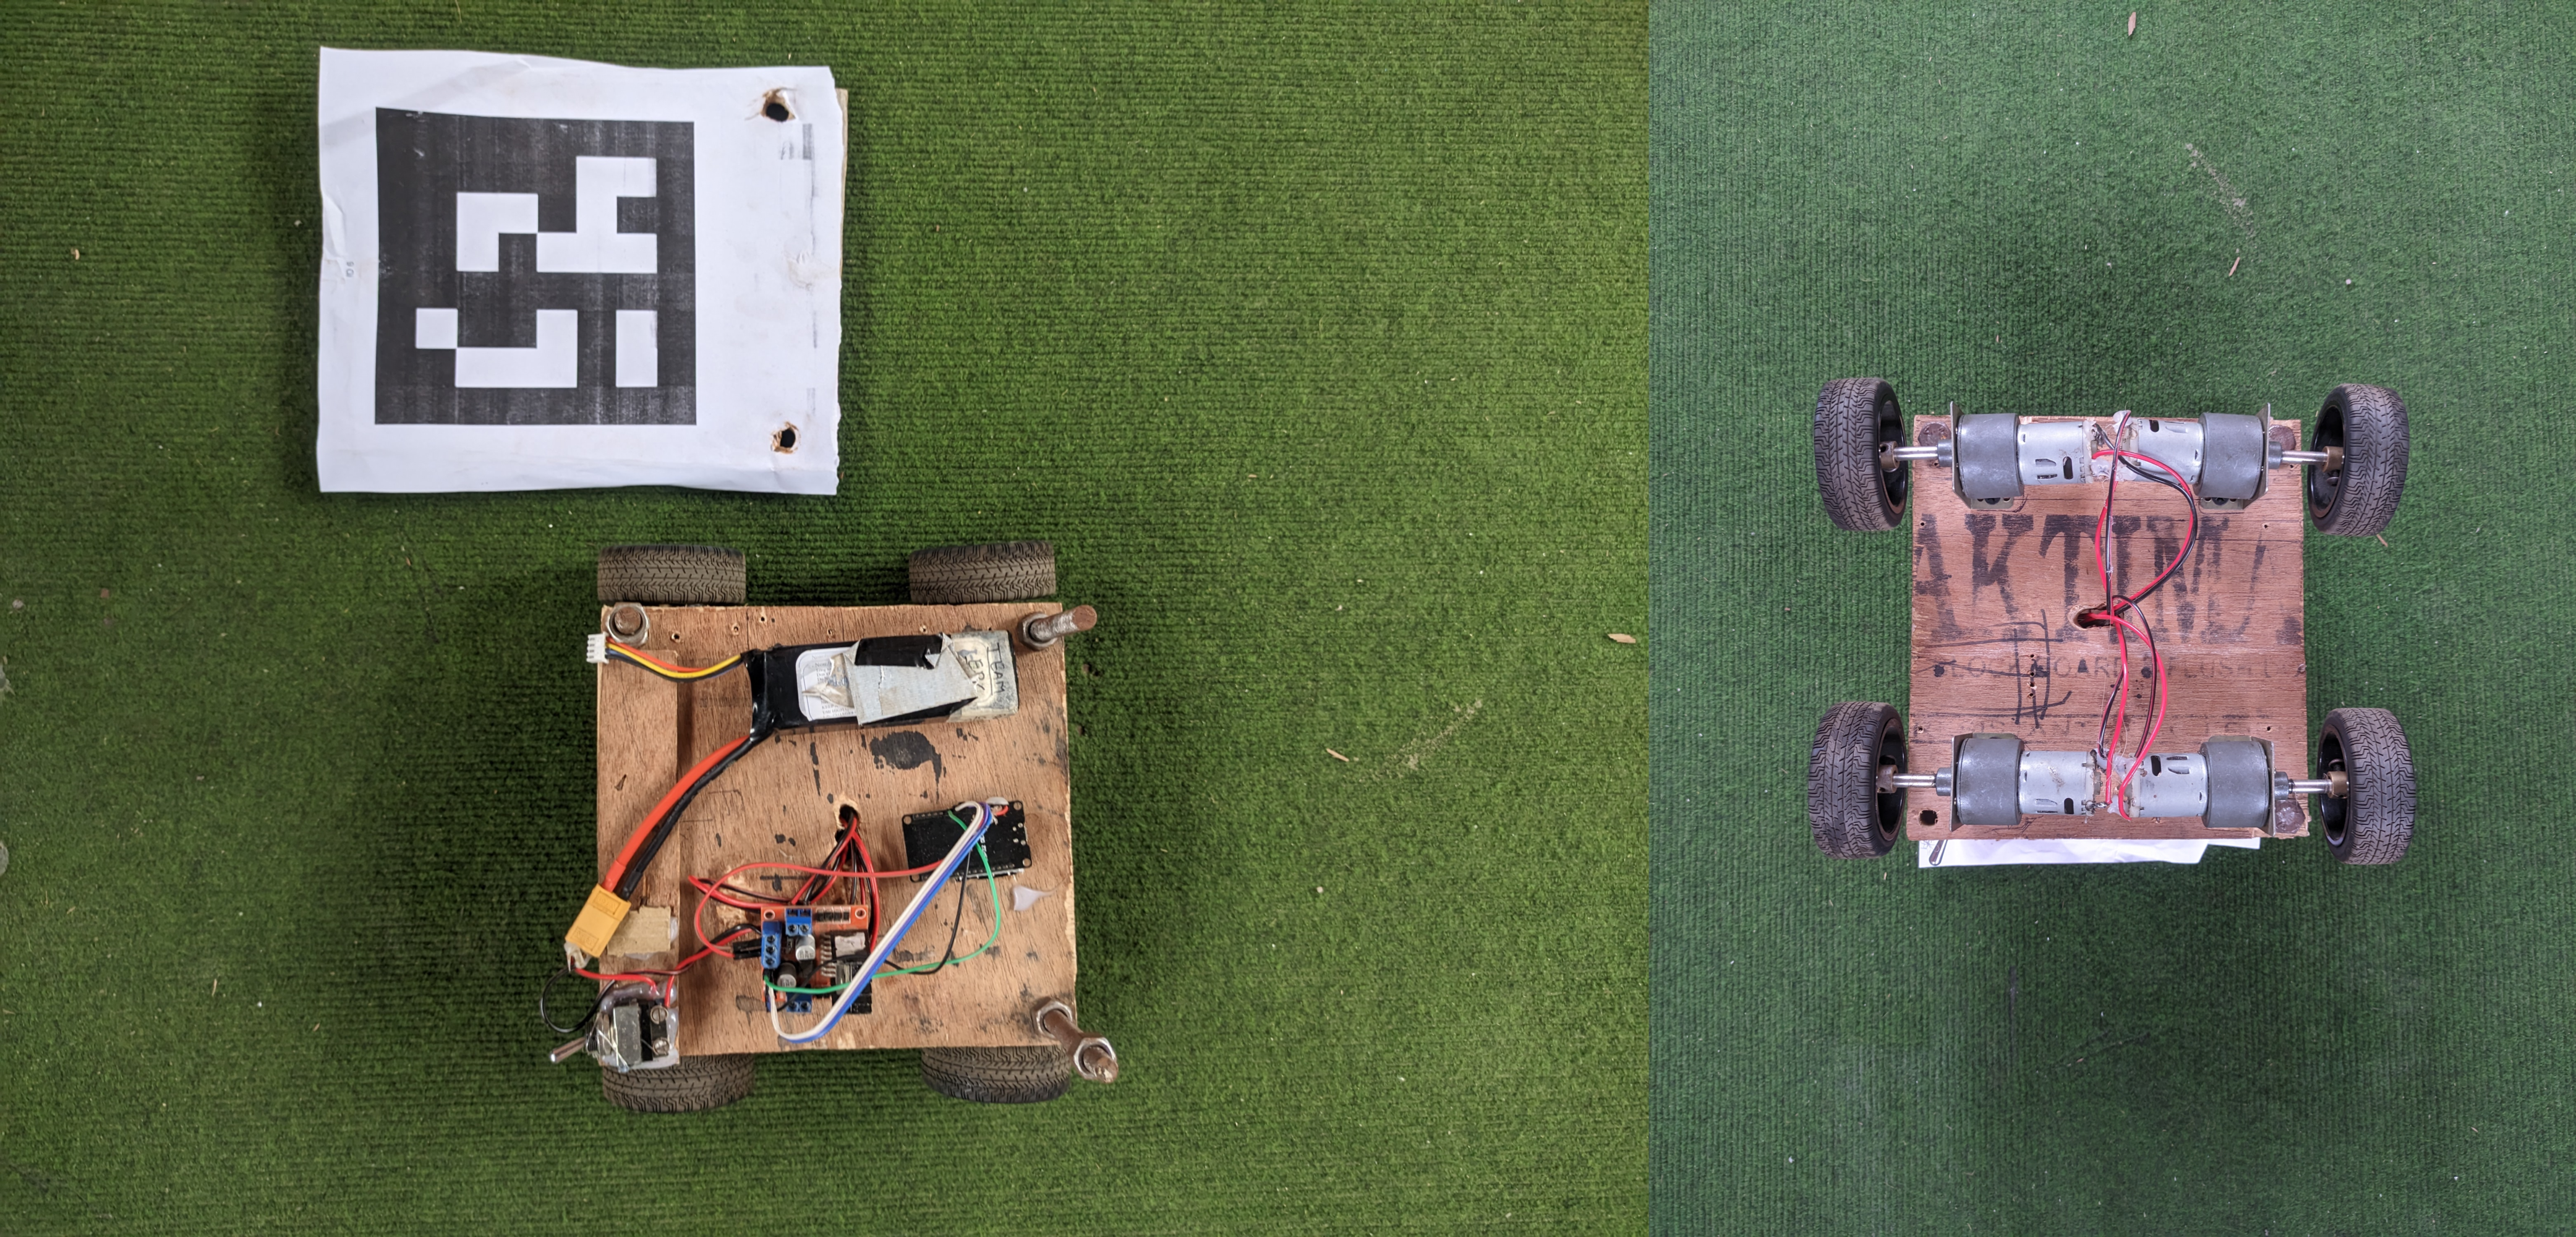
A Smart Waste Management Robot using Python and OpenCV that can detect the nearest waste(Determined by an no 8 ArUco Marker in the video), navigate to it using the shortest path on the map, pick it(Denoted by a 5 second stop in the video) and reach the destination(Determined By no 5 Aruco Marker in the video) to dump it and again repeat the process if more waste is detected; with only sensor being an overhead camera tracking the ArUco Markers.
In the video, I am picking the robot up sometimes to keep it on a new position to show that it can track it's last position and go directly there instead of trying to calculate the route again.
In today's world, efficient waste management is becoming increasingly crucial due to rapid urbanization and population growth. Traditional methods of waste collection and dumping are labor-intensive and often inefficient. By integrating robotics and advanced algorithms, we can streamline these processes, reduce human effort, and ensure a cleaner environment. This project, 'manoid', aims to demonstrate how a robot can autonomously detect, navigate, and manage waste using only a single overhead camera and advanced computer vision techniques.
I have written another blog post related to this: Manoid: Communication
Let's see how it was made.
Requirements:
| Category | Component |
|---|---|
| Hardware | ESP32 Microcontroller |
| Hardware | L298N Motor Driver |
| Hardware | DC Motor and Wheels |
| Hardware | A 12V Battery |
| Hardware | A camera (I used my phone with an IP Camera app for video streaming) |
| Software | Python (for publishing) |
| Software | Arduino IDE (for ESP32 firmware) |
| Software | mosquitto (for serving) |
Basic Setup
Setting Up Arduino IDE
To install the ESP32 board in your Arduino IDE, follow these instructions:
- In your Arduino IDE, go to File > Preferences.
- Enter the following into the “Additional Board Manager URLs” field:
https://raw.githubusercontent.com/espressif/arduino-esp32/gh-pages/package_esp32_index.json
- Click the “OK” button.
- Open the Boards Manager. Go to Tools > Board > Boards Manager.
- Search for ESP32 and press the install button for the “ESP32 by Espressif Systems”.
- Once installed, select your ESP32 board in Tools > Board menu.
- Select the appropriate Port in Tools > Port menu (in my case it was the
DOIT ESP32 DEVKIT V1).
Now your Arduino IDE is set up to work with ESP32.
Setting Up The Environment
I've got my environment all sorted out with Nix and Nix Flake, and I've made it even easier with direnv activation. Mosquitto's up and running smoothly on its default port 1883. python and it's dependencies opencv,numpy,paho-mqtt and flask in a virtual environment are set up via nix flakes as well. You can look at the nix documentation to know more about how it works.
To set it up:
- I assume that nix is installed with flakes enabled on your computer.
- Clone the repo and enter the environment by running
nix developor allowingdirenvto do it for you if you have it installed.
git clone https://github.com/scientiac/manoid
- A MQTT server will be running as soon as you enter the environment on the default port of
1883and you can check the logs using thescreencommand. - Change parameters to match your device and make sure everything in on point.
- Run the
main.pyscript and admire the magic.
Changing Parameters
When adjusting parameters due to dynamic changes in Wi-Fi or IP addresses, several key locations in the code need to be updated to ensure MQTT and IP camera is properly connected. Here's a breakdown of where to make these adjustments:
In the esp32.ino file:
  const char* ssid = "Your_WIFI_SSID";
  const char* password = "Your_WIFI_Password";
  const char* mqtt_server = "Your_MQTT_Server_IP";
In the main.py file:
  MQTT_BROKER = "Your_MQTT_Server_IP" # this is at the top of the document
  args=("http://Your_IP_Camera_feed_Address",) # this is almost at the end of the document

  # to use a usb camera
  args=(0,), # this can be used and the camera may have ID other than `0` so make sure to check that
Tuning the motors is essential because it directly impacts the robot's movement, responsiveness, and overall efficiency. Factors such as the size, power, and weight distribution of the robot, as well as the surface it operates on, can all influence how the motors should be configured.
In the esp32.py file:
  # Tuning the motors
  int left_min_pwm_forward = 110;
  int left_min_pwm_backward = 115;
  int right_min_pwm_forward = 110;
  int right_min_pwm_backward = 115;
In the main.py file (tuning PID settings):
  robot_settings = {
      6: {
          # Robot ID 6
          "P_left": 0.8,
          "P_right": 0.8,
          "P_center": 0.4,
          "I_left": 0.01,
          "I_right": 0.01,
          "I_center": 0.01,
          "D_left": 0.001,
          "D_right": 0.001,
          "D_center": 0.001,
          "backward_speed_left": 10,
          "backward_speed_right": 10,
          "left_prev_error": 0,
          "right_prev_error": 0,
          "center_prev_error": 0,
          "dt": 0.3,
      }
  }
Making the bot:
- Assemble the bot following the diagram below:
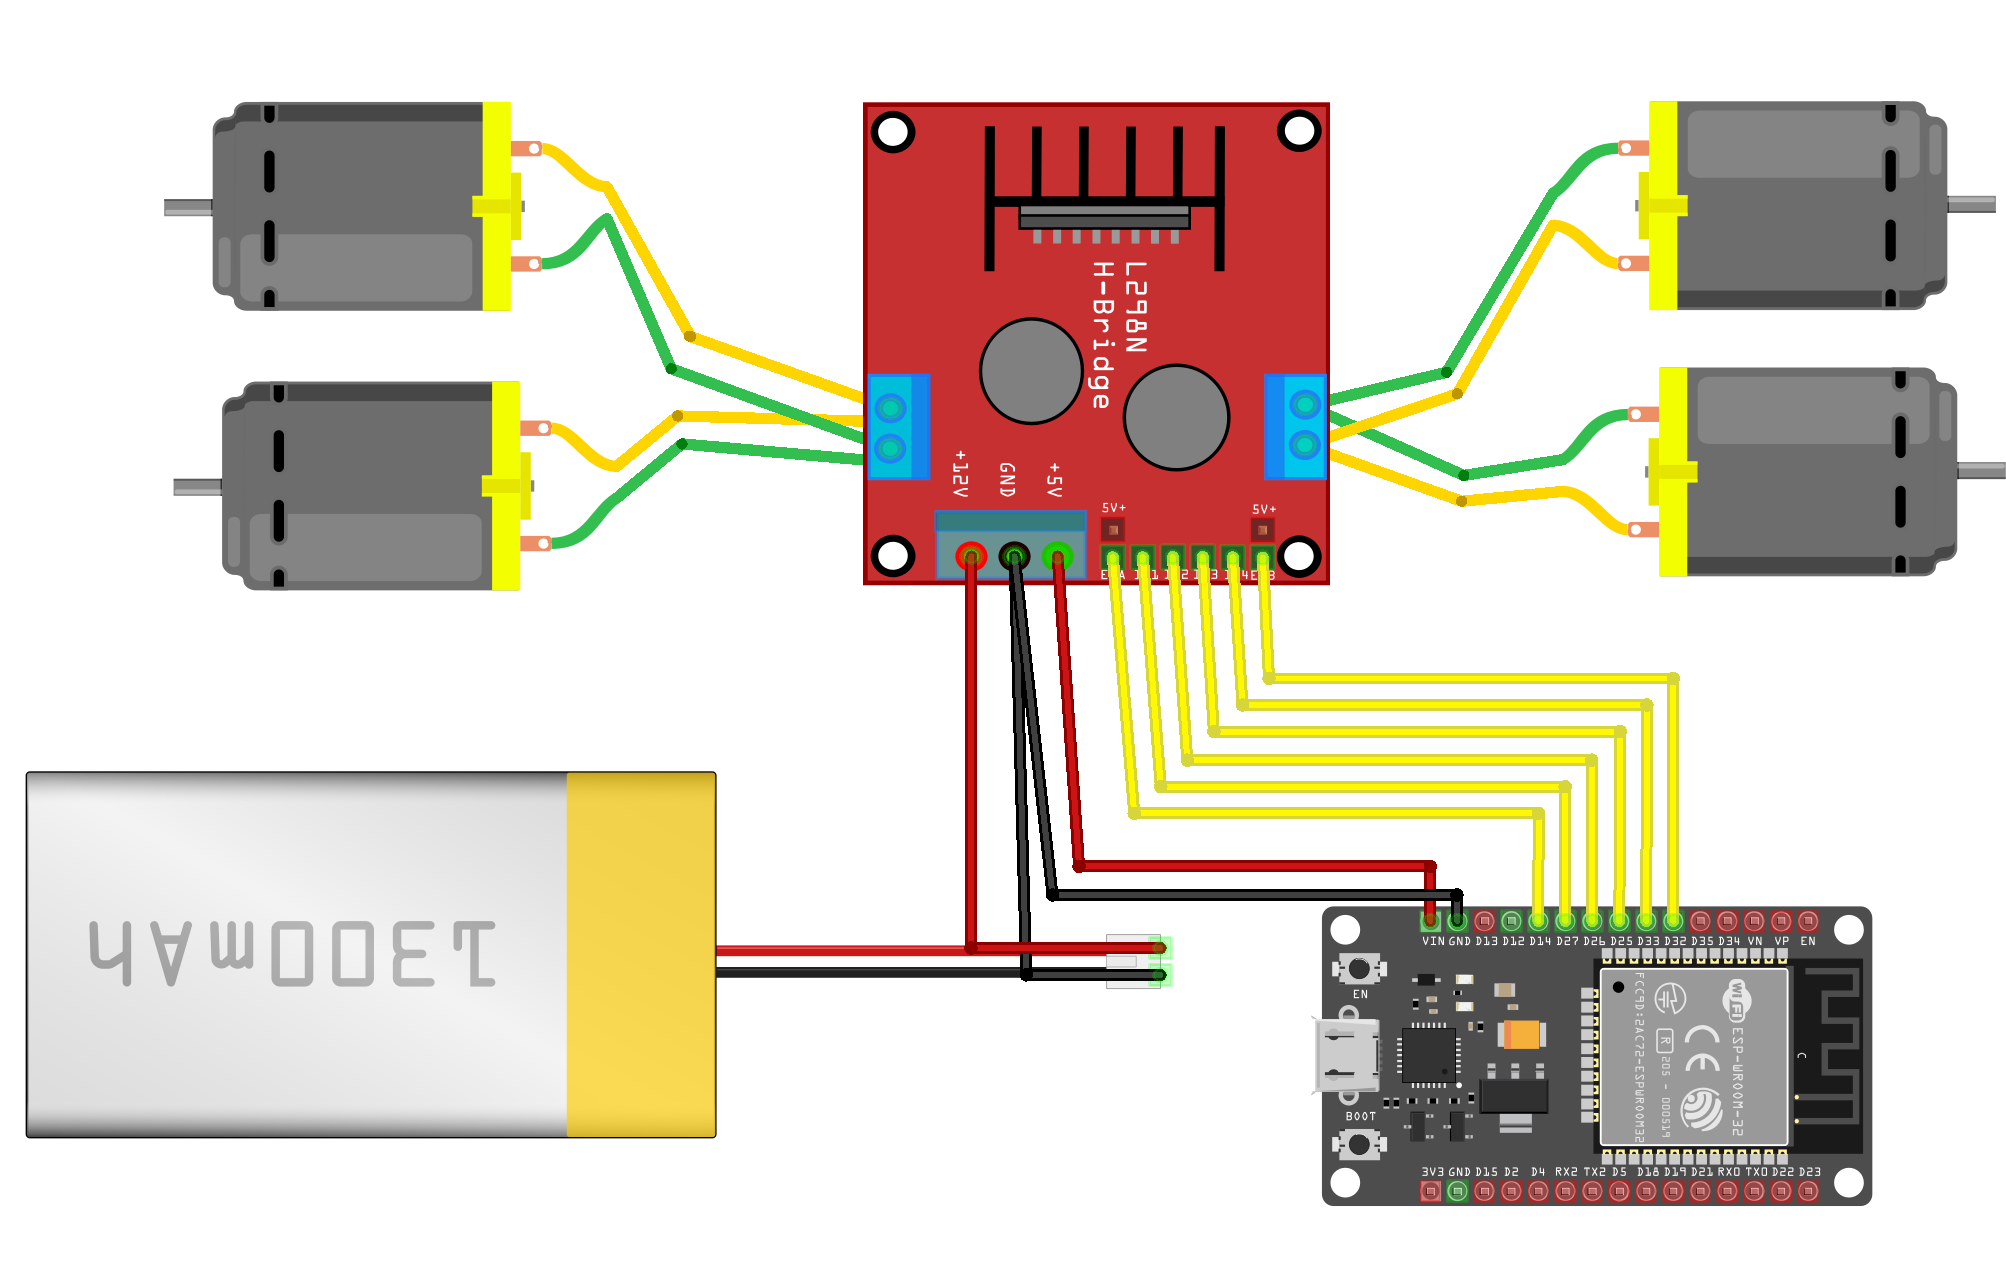
- Then open the file inside the project directory on
etc/esp32/esp32.inoon your Arduino IDE set up to work with esp32 and change the parameters to fit your environment. - And finally flash it!
You can test the bot manually by connecting to the mqtt server using an application (like MyMQTT on android) and sending values from
0to255to the topics :
/robot6_left_forward
/robot6_left_backward
/robot6_right_forward
/robot6_right_backard
where0being the wheels at no speed and255being the max speed
What is in the code?
The Functions, duh!
Click to expand: The Functions
This list contains the functions involved in the robot, with each function's purpose:
1. get_warped_frame(input_frame, marker_ids, PAD)
- Detects ArUco markers in the input frame.
- Extracts the corners of specified markers.
- Warps the frame to correct perspective if all specified markers are detected.
- Returns the warped frame and marker corners.
2. calculate_scale(corners, marker_physical_size_cm)
- Calculates the scale of the marker in pixels per centimeter.
- Uses the distance between two corners of the marker.
3. adjust_marker_corners(corners, offset_x_cm, offset_y_cm, adjust_width_cm, adjust_height_cm, marker_physical_size_cm)
- Adjusts the marker corners based on given offsets and size adjustments in centimeters.
4. detect_aruco_markers(frame, aruco_dict_type)
- Detects ArUco markers in the frame.
- Processes the detected markers and adjusts corners if necessary.
- Returns the detected markers with their centers and corners.
5. heuristic(a, b)
- Calculates the Manhattan distance between two points.
- Used in pathfinding algorithms.
6. astar(start, goal, obstacles, grid_size)
- Implements the A* algorithm to find the shortest path from start to goal.
- Considers obstacles and returns the path if found.
7. connect_mqtt()
- Connects to the MQTT broker to enable robot communication.
8. send_mqtt_command(topic, command)
- Sends a command to the robot via MQTT.
9. get_bot_position(bot_id, markers)
- Retrieves the current position of a robot based on its marker ID.
10. calculate_distances(robot_corners, next_position)
- Calculates the distances from the robot's center and corners to the next position.
11. move_towards_goal(robot_id, path, threshold)
- Moves the robot towards the goal following the given path using PID control.
12. draw_lines_to_goal(frame, robot_corners, goal_position, color, thickness)
- Draws lines from the robot's corners and center to the goal position on the frame.
13. draw_path(frame, path, color, thickness, grid_size)
- Draws the planned path on the frame.
14. get_head_position(robot_id, markers)
- Returns the head position and corners of the robot based on its marker ID.
15. get_waste_positions(markers, waste_id)
- Filters and returns the positions of a specific type of waste.
16. fill_grid_cells_from_corners(corners, grid_size)
- Returns all grid cells covered by a rectangle defined by its corners.
17. update_obstacles(markers, target_waste_ids, robot_head_pos)
- Updates the list of obstacles and finds the nearest waste position.
18. convert_to_grid_coordinates(position, cell_size)
- Converts a position to grid coordinates based on the cell size.
19. convert_obstacles_to_grid(obstacles, cell_size)
- Converts a set of positions to grid coordinates.
20. convert_grid_to_actual(path, cell_size)
- Converts a path of grid coordinates back to actual coordinates.
21. plan_path(start, goal, obstacles)
- Plans a path using the A* algorithm and returns it in actual coordinates.
22. find_nearest_edge_midpoint_to_robot(robot_pos, marker_id, markers)
- Finds the nearest edge midpoint of a marker relative to the robot's position.
23. pickup_waste(robot_id)
- Sends a command to the robot to pick up the waste.
24. drop_off_waste(robot_id, waste_id)
- Sends a command to the robot to drop off the waste and marks it as processed.
25. robot_control_loop(robot_id)
- Main control loop for the robot:
- Connects to MQTT.
- Detects waste, navigates to it, picks it up, and drops it off.
- Repeats the process continuously.
26. capture_and_update_shared_resources(url)
- Continuously captures video frames.
- Detects markers and updates shared resources with the frame and markers.
27. visualize_robot_behavior()
- Visualizes the robot's current behavior on the frame.
- Draws the robot's position, planned path, obstacles, and goal on the frame.

Finally
Testing
To test only the main.py file for it's pathfinding capabilities, you can run the ./pngstream.py file in the etc directory and put http://127.0.0.1:5000/video_feed on the following placeholder in main.py:
args=("http://Your_IP_Camera_feed_Address",) # this is almost at the end of the document
and then run main.py. This will open up a window with the png showing the detected path in the screen along with detecting all the ArUco markers. If only the markers are detected and the path doesn't show up, it can be assumed that the code isn't working corrctly.
I suggest testing this way as soon as nix finishes setting the environment and keep testing the code like this to minimize the need to test it physically.
Troubleshooting Common Issues
- Connection Problems: If the robot fails to connect to the MQTT broker, double-check your Wi-Fi credentials and ensure the broker's IP address is correct in both the ESP32 firmware and main.py. (The main.py script will print errors if something isn't properly connected.)
- Movement Issues: If the robot's movements are erratic or it doesn't move as expected, recheck the motor connections and ensure the PWM values are correctly tuned in
main.pyandesp32.ino. - Marker Detection Failures: If the robot cannot detect ArUco markers, ensure the camera feed is clear and unobstructed. Adjust the camera's focus and lighting conditions to improve detection accuracy."
Possible Improvements
- In my pathfinding algorithm, I don't search for the diagonal paths which lengthens the "short path" as I wanted the robot to face
the wasteorthe destinationfrom either sides of the square and not the corners. - Making swarm robots instead of using only one.
- Making the code object-oriented.
- Adding grippers to grab the waste instead of the 5-second delay and drop the waste on its destination.
We had added the functionalities of gripping and swarm navigation when using this bot on a Robotics Competition in Nepal called
Yantra Swarmanoidbut decided to remove it on this showcase, though the code to grab and drop the waste is still in there in 'main.py'.